
How do I Enable Hibernation on Windows 11? [Easy Steps]
The Hibernate feature in Windows 11 works by saving the entire contents of your system memory (RAM) to a file stored on your hard drive called hiberfil.sys. This file contains everything that was running on your computer, including open applications, documents, browser tabs, and system processes.
When you select Hibernate, the operating system copies the contents of RAM to this file and then completely shuts down the computer. Since the system is powered off, it consumes zero electricity. The next time you turn the computer on, Windows loads the saved session from the hiberfil.sys file and restores your system exactly as it was.
What is the Use of the Hibernate feature?
This feature is extremely useful for several reasons.
- First, it allows you to save battery life on laptops. If your device battery is low, you can hibernate the system instead of leaving it in sleep mode.
- Second, it is ideal for users who frequently work with multiple programs and documents. Instead of reopening everything manually, the system restores your entire workspace automatically.
- Third, it provides a safer alternative to Sleep mode when you are not going to use your computer for an extended period.
Despite these advantages, Hibernation may not appear in the Power menu by default. Many systems ship with it disabled to save disk space because the hibernation file can occupy several gigabytes, depending on the size of your RAM.
In this guide, you will learn how to enable Hibernation on Windows 11 and how to activate it on your PC or laptop.
How do I Enable Hibernation on Windows 11?
To enable Hibernation in Windows 11, open Control Panel, go to Power Options, select Choose what the power buttons do, click Change settings that are currently unavailable, enable the Hibernate checkbox under Shutdown settings, and click Save changes. The Hibernate option will then appear in the Power menu of Windows 11.
The following steps explain how to enable the Hibernate option on your Windows 11 computer.
Step 1: Open the Control Panel in Windows 11
The first step is to access the Control Panel, which contains the power management settings required to enable Hibernation.
To open it, click the Start Menu and type Control Panel into the search bar. When the Control Panel appears in the search results, click it to open the application.
The Control Panel window will display several categories related to system configuration, including System and Security, Network and Internet, Hardware and Sound, and others.
Next, locate the System and Security category and click on it. This section contains tools for system maintenance, security settings, and power management.
Within this category, you will find Power Options, which is where Windows manages features like Sleep, Hibernate, and display power settings.
Opening the correct settings area is important because the Hibernate option cannot be enabled directly from the standard Windows Settings app in some systems.
Once you access the Power Options menu, you can move on to the next step.
Step 2: Access the Power Options Settings
Inside the System and Security section of Control Panel, locate and click Power Options.
The Power Options window shows the current power plan your computer is using. Most systems operate under either Balanced, Power Saver, or High Performance plans.
These power plans control how the system manages power consumption, screen brightness, processor performance, and sleep behavior.
On the left side of the Power Options window, you will see several configuration links. Look for the option called Choose what the power buttons do and click on it.
This section allows you to define how Windows behaves when you press the Power button, Sleep button, or when you close the laptop lid.
More importantly, this page also contains the Shutdown settings, which include the options for Sleep, Hibernate, Shutdown, and Lock.
However, these options may appear grayed out at first. To modify them, you need to unlock administrative settings in the next step.
Step 3: Unlock the Shutdown Settings
After opening the Choose what the power buttons do page, you will notice that the Shutdown settings section may not allow changes immediately.
This happens because Windows protects certain power settings from accidental modification.
To enable editing, locate the option at the top of the page labeled Change settings that are currently unavailable.
Clicking this link grants administrative access to the shutdown settings. If prompted by User Account Control, confirm the action by selecting Yes.
Once this option is activated, the previously locked settings will become editable.
You will now see several checkboxes under the Shutdown settings section. These checkboxes allow you to choose which options appear in the Windows Power menu.
Among them, you should see Hibernate, which is the option we want to enable.
Step 4: Enable the Hibernate Option
Now that the settings are unlocked, scroll down to the Shutdown settings section.
Look for the checkbox labeled Hibernate.
If the box is unchecked, the Hibernate option is currently disabled on your system. Simply click the checkbox to enable it.
When this option is selected, Windows adds Hibernate to the list of available power actions in the Start menu.
At this stage, the system is ready to use the hibernation feature, but the changes will not apply until you save the configuration.
Therefore, the next step is to confirm the changes.
Step 5: Save the Changes
After enabling the Hibernate checkbox, scroll to the bottom of the page and click Save changes.
This step finalizes the configuration and applies the new power settings to your computer.
Once the changes are saved, the Hibernate option becomes visible in the Power menu within the Start menu.
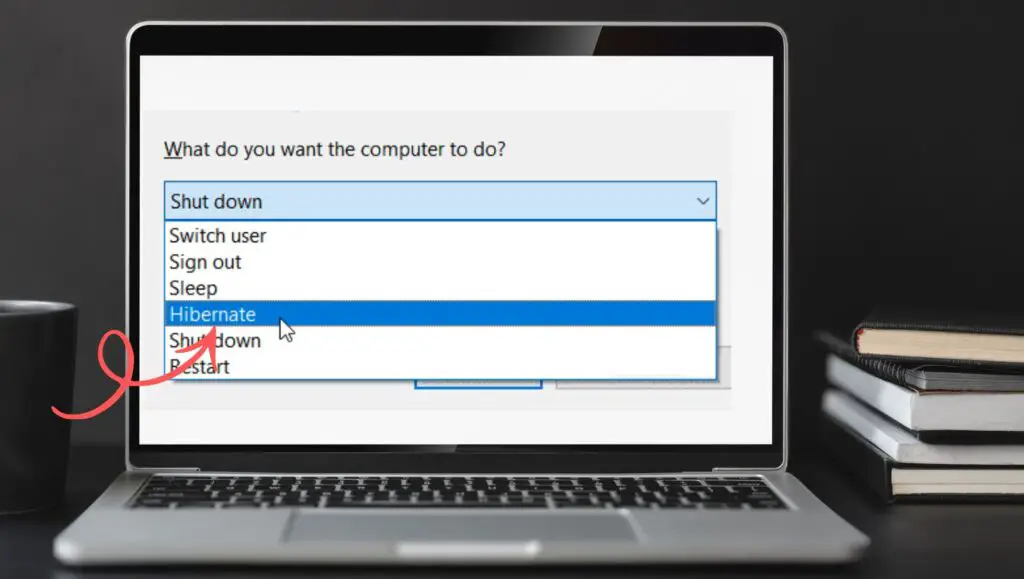
To confirm this, click the Start button, select the Power icon, and check whether Hibernate appears alongside options such as Sleep, Restart, and Shutdown.
If you see the Hibernate option listed, the feature has been successfully enabled.
From now on, you can select Hibernate whenever you want to save your session and completely power off your computer.
Enable Hibernate Using Command Prompt
In some cases, the Hibernate option may not appear even after enabling it through the Control Panel.
This usually happens if the hibernation feature is disabled at the system level.
To enable it manually, you can use Command Prompt with administrative privileges.
Open the Start menu and type Command Prompt. Then right-click the result and choose Run as administrator.
Once the command window opens, type the following command:
powercfg /hibernate on
Press Enter to execute the command.
This command activates the hibernation feature and creates the hiberfil.sys file is required for saving system memory.
After running the command, return to the Power Options settings and enable the Hibernate checkbox if needed.
This method is especially useful for advanced users or systems where the hibernation feature has been disabled through system configuration.
FAQs
What is the difference between Sleep and Hibernate in Windows 11?
Sleep mode stores the system state in RAM and keeps the computer running in a low-power state. Hibernate mode saves the system state to the hard drive and completely shuts down the computer.
Sleep resumes faster, but Hibernate consumes no power.
Why is the Hibernate option missing in Windows 11?
The Hibernate option may be missing because the feature is disabled by default or the hiberfil.sys file has not been created. Enabling it through Power Options or using the powercfg /hibernate command usually fixes the issue.
Does Hibernate use storage space?
Yes. Windows creates a system file called hiberfil.sys, which stores the contents of RAM when the system enters hibernation. The file size typically equals a percentage of your installed memory.
Is Hibernate safe for laptops?
Yes. Hibernate is very safe and is commonly used to preserve battery life. Since the computer completely powers off, there is no battery drain while the device is in hibernation.
Can I disable Hibernate later?
Yes. You can disable it by returning to Power Options and unchecking the Hibernate option, or by using the command:
powercfg /hibernate off
This will remove the hiberfil.sys file and free up disk space.