
Fix Error Code 0x800704f8: Windows Cannot Access
Running into the 0x800704f8 error code while trying to access a file, folder, shared network location, or Windows resource can be frustrating. You might see a message saying “Windows cannot access” followed by an error code.
Sometimes, the problem appears when opening a shared folder on another computer, accessing a network drive, or connecting to a Windows resource.
This error generally indicates that Windows cannot complete the requested access operation. It may happen because of incorrect network settings, permission restrictions, Windows Firewall interference, damaged system files, or problems with network-related services.
In this guide, I’ll walk you through several ways to fix error code 0x800704f8: Windows cannot access on Windows 10 and Windows 11.
Fix Error Code 0x800704f8: Windows Cannot Access
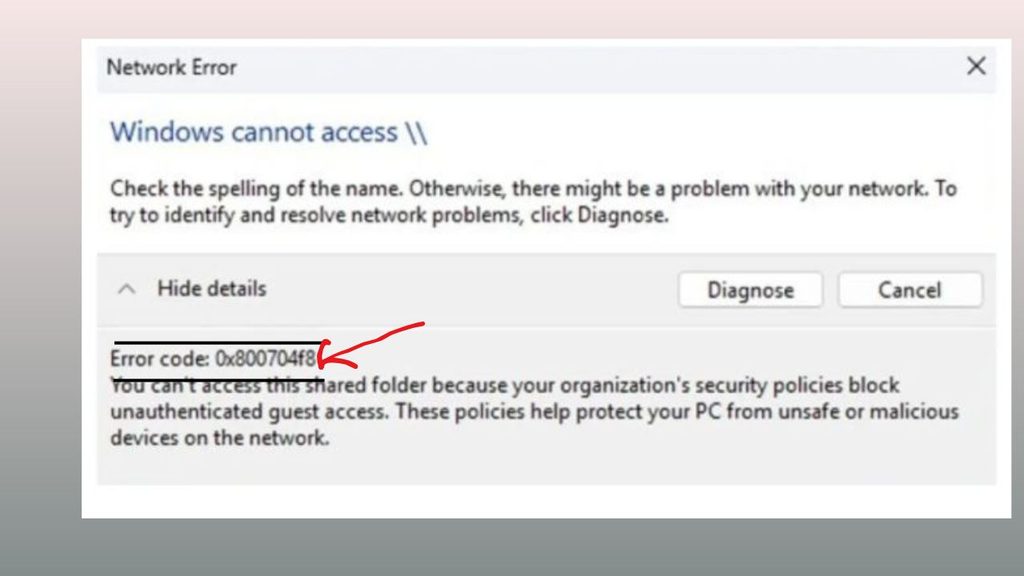
To fix Windows error code 0x800704f8, restart your computer and router, check file-sharing permissions, enable network discovery, verify Windows network services, temporarily test firewall settings, and run the SFC and DISM commands.
If the error continues, reset your network configuration and try accessing the resource again.
1: Restart Your Computer and Network Router
Sometimes, Windows cannot access a shared resource because of a temporary network or system glitch. Restarting your computer and router can refresh the connection and resolve minor communication problems.
Start by saving your open work and closing all applications. Click the Start button, select Power, and choose Restart.
Once Windows starts again, check whether you can access the same file, folder, or network location.
If you’re accessing a shared folder over Wi-Fi or Ethernet, restart your router as well. Disconnect its power cable, wait approximately 30 seconds, and plug it back in. Give the router a couple of minutes to reconnect to the internet and restore your local network.
Now try opening the resource again.
If the error remains, move to the next solution.
2: Check Your Network Connection
A weak or interrupted network connection can prevent Windows from communicating with another computer or network device.
First, make sure your computer is connected to the correct Wi-Fi network. If you’re using an Ethernet cable, check that both ends are connected properly.
Next, open your browser and visit a website to confirm that your internet connection is working.
However, remember that accessing a shared folder on your local network does not always require an active internet connection. Your computer and the device hosting the shared folder simply need to communicate over the same reachable network.
To check your connection, press Windows + R, type cmd, and press Enter.
In Command Prompt, enter:
ipconfig
Look for your active network adapter and check its IPv4 Address.
If you’re accessing another computer, check its IPv4 address too. Make sure both devices are connected to the intended network.
3: Enable Network Discovery and File Sharing
If you’re trying to access a shared folder on another computer, make sure Network Discovery and File and Printer Sharing are enabled.
These settings allow Windows computers on the same local network to find each other and share files.
Open Settings using Windows + I. Select Network & Internet, then open your active Wi-Fi or Ethernet connection.
Find the Network Profile Type option and select Private if this is your trusted home or office network.
Now, open Control Panel and navigate to:
Network and Internet > Network and Sharing Center > Change advanced sharing settings.
Expand the Private networks section and turn on Network Discovery and File and Printer Sharing.
Click Save Changes.
Try accessing the shared folder again. If Windows still displays error 0x800704f8, continue with the next method.
4: Check Shared Folder Permissions
Incorrect sharing permissions can prevent you from opening a folder even when the network connection is working correctly.
To check the permissions, go to the computer that contains the shared folder.
Open File Explorer and locate the folder you want to share. Right-click it and select Properties.
Open the Sharing tab and click Advanced Sharing.
Make sure Share this folder is checked. Then select Permissions to review which accounts have access.
For better security, add the specific Windows account that needs access instead of allowing everyone to connect anonymously.
Next, open the Security tab in the folder’s Properties window. Check whether the same user has the required permissions here.
Remember that Windows checks both sharing permissions and NTFS security permissions. Both must allow the requested access.
Click Apply and OK after making the necessary changes.
5: Enable Insecure Guest Logons (Only If Necessary with Caution)
One of the most relevant causes of error code 0x800704f8 is Windows blocking unauthenticated guest access to a network share.
This commonly happens when connecting to older NAS devices, router-based storage, or computers that offer shared folders without requiring a username and password.
Windows blocks these connections to protect your computer from potentially unsafe network devices. Microsoft also documents this behavior in its SMB security guidance.
The safest approach is to configure the shared device to use a proper username and password. However, if your device only supports guest access, you can consider the following workaround on a trusted private network.
Press Windows + R, type gpedit.msc, and press Enter.
In the Local Group Policy Editor, navigate to:
Computer Configuration > Administrative Templates > Network > Lanman Workstation.
Find Enable insecure guest logons and double-click it.
Select Enabled, click Apply, and then click OK.
Restart your computer and try accessing the shared folder again.
Important: This setting reduces network security because guest connections do not provide normal user authentication. Avoid enabling it on public Wi-Fi, untrusted networks, or business computers without administrator approval.
If you’re using Windows Home and don’t have Group Policy Editor, skip this method rather than installing unofficial tools.
6: Configure SMB Security Settings
Windows uses Server Message Block (SMB) to communicate with shared folders and network storage devices.
Older devices may not support the security requirements enforced by newer Windows versions. This can cause connection problems, particularly when connecting to legacy NAS devices.
Windows 11 version 24H2 strengthened SMB signing requirements, which can affect older devices that rely on insecure guest connections.
The recommended solution is to update the NAS firmware and configure it to support authenticated SMB2 or SMB3 connections with signing enabled.
If you’re managing an older device, contact its manufacturer to check whether a firmware update is available.
Avoid disabling SMB signing as a routine troubleshooting step. It weakens protection against network tampering and may not resolve the underlying guest authentication problem.
7: Check Windows Firewall Settings
Windows Firewall can sometimes block file-sharing traffic, preventing your computer from communicating with another device.
To check its settings, open the Start menu and search for Windows Defender Firewall.
Select Allow an app or feature through Windows Defender Firewall.
Click Change settings and locate File and Printer Sharing.
Make sure the checkbox under Private is selected.
If you’re using a third-party security application, check whether it has separate network protection settings.
Do not permanently disable your firewall to solve this issue. Instead, make sure file sharing is allowed only on networks you trust.
8: Run the Network Troubleshooter
Windows includes troubleshooting tools that can help identify common network connection problems.
Press Windows + I to open Settings.
In Windows 11, navigate to System > Troubleshoot > Other troubleshooters.
Find Network and Internet if available, and select Run.
In Windows 10, open Settings > Update & Security > Troubleshoot > Additional troubleshooters and look for the Network Adapter troubleshooter.
Follow the instructions displayed on your screen.
Once the troubleshooting process finishes, restart your computer and check whether the error has disappeared.
9: Reset Network Settings Using Command Prompt
If none of the previous methods work, your network configuration may be causing the problem.
You can reset several network components using Command Prompt.
Click Start, search for Command Prompt, right-click it, and select Run as administrator.
Enter the following commands one at a time, pressing Enter after each:
netsh winsock reset
netsh int ip reset
ipconfig /release
ipconfig /renew
ipconfig /flushdns
These commands reset Winsock, refresh IP settings, renew your network address, and clear the DNS cache.
After running all five commands, restart your computer.
Keep in mind that resetting network settings may interrupt VPN connections or require you to reconnect to Wi-Fi.
10: Connect Using the Correct Username and Password
If your shared folder requires authentication, make sure you’re entering the correct credentials.
Open File Explorer and type the network address in the address bar. For example:
\\192.168.1.10\SharedFolder
Replace the example IP address and folder name with your actual network details.
When Windows asks for credentials, enter the username and password associated with the computer or NAS device hosting the folder.
If you’ve previously entered incorrect credentials, open Control Panel > Credential Manager > Windows Credentials.
Find the saved credentials associated with the network device and remove only the outdated entry.
Try connecting again using the correct account details.
This is particularly useful when Windows keeps attempting to connect using previously saved login information.
11: Check Windows Updates
An outdated Windows installation can sometimes cause compatibility problems with network devices and sharing features.
To check for updates, open Settings > Windows Update in Windows 11 or Settings > Update & Security > Windows Update in Windows 10.
Click Check for updates and allow Windows to download and install available updates.
Restart your computer if required.
If the error started immediately after installing a particular update, check Update history > Uninstall updates. Only consider removing a recent update after confirming that it caused the problem, and avoid uninstalling security updates unnecessarily.
FAQs
1. What does error code 0x800704f8 mean in Windows?
Error code 0x800704f8 can appear when Windows refuses to access a network share because its security policies block unauthenticated guest access. This is particularly relevant when connecting to older NAS devices and shared folders that don’t require login credentials.
2. Why does Windows 11 show error 0x800704f8?
Windows 11 may show this error because of stricter network security requirements, including restrictions on guest access and SMB signing. Older network storage devices may not support these requirements.
3. Can I fix error 0x800704f8 without reinstalling Windows?
Yes. You generally don’t need to reinstall Windows. Checking network permissions, configuring proper authentication, updating your network device, and resetting network settings can resolve the problem.
4. Is enabling insecure guest logons safe?
Not entirely. It allows unauthenticated network connections, which can expose your computer to security risks. Use it only when necessary on a trusted private network. Using password-protected sharing is a safer alternative.
5. Does error 0x800704f8 affect Windows 10 and Windows 11?
Yes, this error can occur on both operating systems. However, the exact cause depends on the Windows configuration, network device, and type of resource you’re trying to access.
6. Why can I see another computer but cannot open its shared folder?
Network discovery and file access are separate things. Your computer may discover another device but still be blocked by authentication requirements, incorrect permissions, or incompatible SMB security settings.