
Fix Multiple Google Chrome Processes (Chrome.exe) Running in Windows 11/10
Have you ever opened Task Manager on your Windows PC and noticed several Google Chrome processes running simultaneously? You might see multiple entries named chrome.exe, even when you have only one Chrome window open. If you’re wondering whether this is normal or a sign of a problem, you’re not alone.
Google Chrome uses a multiprocess architecture to keep browsing fast, stable, and secure. However, running too many processes can sometimes consume excessive RAM and CPU resources, especially on computers with limited memory.
In this guide, you’ll learn why multiple Chrome processes appear and how to manage them safely in Windows 11 and Windows 10.
Why Are There Multiple Chrome.exe Processes?
Google Chrome creates separate processes for different tasks, including browser tabs, extensions, website rendering, and background activities. This design helps prevent one problematic tab from crashing the entire browser and improves security by isolating certain activities.
For example, if you open several websites, install multiple extensions, or use web apps that run in the background, Chrome may create additional processes.
However, if Chrome uses unusually high memory or CPU resources, an extension, a malfunctioning tab, a background app, or a browser issue could be responsible.
Important: Multiple Chrome.exe processes are normal. The goal is not to eliminate all of them but to reduce unnecessary resource usage and fix any processes behaving abnormally.
Fix Multiple Google Chrome Processes (Chrome.exe) Running in Windows 11/10
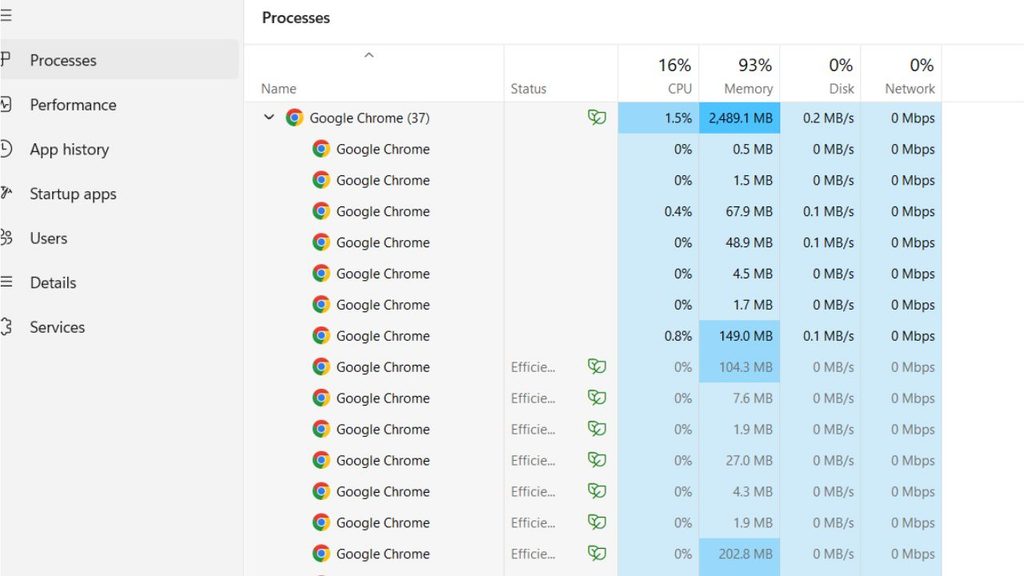
To reduce unnecessary Google Chrome processes in Windows 11 or Windows 10, close unused tabs, disable unnecessary extensions, turn off background apps, check Chrome’s Task Manager, update the browser, and scan for malware if needed.
Follow these methods in order.
Step 1: Close Unnecessary Chrome Tabs
Every open tab can require memory and processing power. Although Chrome sometimes shares processes between tabs, opening many websites can increase its overall resource usage.
Open Google Chrome and review your open tabs. Close the websites you no longer need by clicking the X on each tab.
If you regularly keep dozens of tabs open, consider bookmarking important pages instead of leaving everything open throughout the day.
Now press Ctrl + Shift + Esc to open Task Manager. If necessary, select More details to display the full interface.
In Windows 11, open the Processes section. In Windows 10, select the Processes tab. Find Google Chrome and expand its group if available.
Check the Memory and CPU columns to see whether resource usage has decreased. Keep in mind that Chrome may continue running several processes even after you close some tabs. That is expected behavior.
Step 2: Use Chrome’s Built-in Task Manager
Windows Task Manager shows Chrome’s overall resource usage, but Chrome has its own Task Manager that identifies which tabs and extensions consume the most resources.
Open Chrome and press Shift + Esc. If that shortcut doesn’t work in your version, open Chrome’s three-dot menu and look under More tools for Task Manager.
A small window will display Chrome activities, such as tabs, extensions, and browser processes. Review the Memory footprint and CPU columns to identify unusually demanding items.
For example, a website that uses hundreds of megabytes of memory may be responsible for much of Chrome’s resource consumption. An extension that continuously uses CPU resources could also be the cause.
Select a tab or extension that you recognize as unnecessary, then click End process. Be careful not to terminate something you need, because ending a tab’s process may cause that page to stop working or lose unsaved work.
Repeat this check when Chrome becomes slow. Identifying the specific source of high resource usage is more effective than trying to stop every chrome.exe process.
Step 3: Disable Unnecessary Chrome Extensions
Extensions add features such as password management, shopping assistance, grammar checking, and ad blocking. However, poorly optimized or outdated extensions can consume memory and create additional background activity.
Open Chrome and type chrome://extensions into the address bar. Press Enter to open the extensions page.
Review the installed extensions and identify those you rarely use or don’t recognize. Turn off the toggle for an extension to disable it temporarily.
Do not disable security or password-management extensions without considering how doing so might affect your protection or workflow. If you’re unsure which extension is responsible, disable nonessential extensions one at a time and observe the results.
After disabling an extension, restart Chrome and check its resource usage in Task Manager.
If performance improves, re-enable extensions individually until you identify the one causing the problem. You can then update or remove that extension.
Step 4: Turn Off Background Apps in Chrome
Google Chrome can continue running certain apps and extensions after you close its windows. This behavior may be useful for some notifications or background tasks, but it can also consume system resources unnecessarily.
Open Chrome and navigate to Settings from the three-dot menu.
Select System in the settings sidebar. Depending on your Chrome version, you may find the option named Continue running background apps when Google Chrome is closed.
Turn this option off if you don’t need Chrome to keep running background tasks after you close the browser.
Close Chrome completely, then open Task Manager to check whether Chrome processes remain active. Some processes may take a short time to exit.
Remember that disabling background activity can affect extensions or web apps that rely on it. If you depend on those features, turn the setting back on when needed.
Step 5: Disable Unnecessary Startup and Background Programs
Sometimes Chrome’s resource usage increases because other applications launch Chrome automatically or keep interacting with it in the background.
Open Task Manager by pressing Ctrl + Shift + Esc. In Windows 11, select Startup apps from the sidebar. In Windows 10, open the Startup tab.
Review the applications listed there. If an application you recognize is unnecessary at startup, select it and choose Disable.
Do not disable unfamiliar system components or security software. This step is intended for optional programs that you understand and don’t need running automatically.
Next, review Chrome’s extensions and installed applications for tools that open websites or browser windows automatically.
Restart your computer and observe whether Chrome starts with fewer unnecessary background activities. This method won’t eliminate Chrome’s normal multiprocess design, but it can reduce unwanted activity.
Step 6: Update Google Chrome
An outdated browser may contain bugs or performance problems that have already been addressed in a newer release. Updating Chrome is a simple way to rule out known browser issues.
Open Chrome and click the three-dot menu in the upper-right corner.
Select Help > About Google Chrome. Chrome will automatically check for available updates and begin installing them when necessary.
Wait for the process to finish. If Chrome asks you to relaunch the browser, save any unsaved work and select Relaunch.
After Chrome reopens, visit a few websites and check Task Manager again.
If Chrome was already up to date, continue to the next method.
Step 7: Clear Chrome’s Cached Data
Corrupted or outdated cached website data can sometimes contribute to browser problems. Clearing the cache may help if Chrome is freezing, responding slowly, or consuming unusually high resources.
Open Chrome and press Ctrl + Shift + Delete.
The Delete browsing data window will appear. Select an appropriate time range, such as All time, if you want to clear the entire cache.
Select Cached images and files. You can leave browsing history and cookies unchecked if you don’t want to remove those items.
Click Delete data and wait for Chrome to finish. Cached files will be recreated as you revisit websites.
Keep in mind that clearing the cache won’t necessarily reduce the number of Chrome processes. It is mainly useful when cached data may be contributing to a broader browser problem.
Step 8: Check for Malware or Unwanted Software
Unwanted software can interfere with browser behavior, redirect searches, or launch unexpected processes. Although multiple Chrome processes alone do not indicate malware, a suspicious change in browser behavior deserves attention.
Open Windows Security from the Start menu. Select Virus & threat protection, then click Quick scan.
Allow the scan to finish and follow any recommended actions. If you suspect a persistent infection, consider running a full scan.
You can also review Chrome’s installed extensions and remove any that you don’t recognize or no longer trust. Avoid downloading unofficial Chrome cleanup tools or random programs that claim to remove all Chrome processes.
If Windows Security identifies a threat, follow its instructions and restart your PC if requested. Then open Chrome and check whether the unwanted behavior has stopped.
Step 9: Reset Chrome Settings
If Chrome continues consuming excessive resources after you’ve tried the previous methods, resetting its settings may help resolve problems caused by unwanted configuration changes.
Open Chrome and go to Settings.
Select Reset settings, then choose Restore settings to their original defaults. Read the confirmation message carefully before proceeding.
Confirm the reset if you’re comfortable with the changes. Chrome will reset settings such as the startup page, search engine, pinned tabs, and certain site settings. Extensions will be disabled, and temporary data such as cookies may be affected. Bookmarks and saved passwords are generally not deleted by this reset.
After the reset, restart Chrome and check its behavior in Task Manager.
If the problem disappears, re-enable only the extensions you need and monitor performance as you add them back.
FAQs
1. Why are there so many Chrome.exe processes in Task Manager?
Chrome uses separate processes for different tabs, extensions, website components, and browser tasks. This is normal and helps improve security and stability.
2. Can I end all Chrome.exe processes?
You can close Chrome and end its remaining processes through Task Manager if necessary, but you shouldn’t routinely terminate every process while using the browser. Doing so can close tabs and interrupt downloads or other tasks.
3. How do I reduce Chrome’s RAM usage?
Close unused tabs, disable unnecessary extensions, turn off background apps, and use Chrome’s Task Manager to identify demanding websites. If your computer has limited memory, Chrome’s Memory Saver feature may also help by deactivating eligible inactive tabs.
4. Are multiple Chrome.exe processes a virus?
Not usually. Multiple Chrome processes are part of Chrome’s normal design. Investigate further if you notice suspicious extensions, unexpected redirects, unknown software, or unusual resource usage.
5. Will reinstalling Chrome fix the problem?
Reinstalling Chrome may help if the browser installation is damaged, but it usually isn’t necessary just because multiple processes appear. Try the simpler troubleshooting methods first, and make sure your bookmarks and other important data are backed up before reinstalling.
Summary
Multiple Google Chrome processes running in Windows 11 or Windows 10 are usually normal. Chrome separates browser activities into different processes to improve stability, security, and performance.
If Chrome uses too much RAM or CPU, start by closing unnecessary tabs and checking Chrome’s Task Manager. Then disable problematic extensions, turn off background apps, update Chrome, and scan for unwanted software if necessary.
If the problem continues, reset Chrome settings and investigate any specific tab or extension responsible for excessive resource usage. You don’t need to eliminate every Chrome.exe process.
Focus on reducing unnecessary resource consumption while keeping the browser working as intended.